这篇文章主要为大家详细介绍了Unity实现主角移动与摄像机跟随,文中示例代码介绍的非常详细,具有一定的参考价值,感兴趣的小伙伴们可以参考一下
在游戏开发中,主角需要通过跑地图来通关升级,本章主要介绍主角的移动和摄像跟随的操作。
主角移动
角色位移通过主角的骨骼动画控制(后续文章会详细介绍状态机的使用),这里只需要勾选Animator动画控制器下Apply Root Motion让角色的移动受动画控制。
通过碰撞检测来判断哪些位置主角可以移动,哪些位置角色不能行走,这里需要两个组件Rigidbody刚体,和Collider碰撞组件
- Rigidbody:为游戏赋予物理属性,在游戏中只有添加了刚体的物体才能模拟物理属性,如重力等。
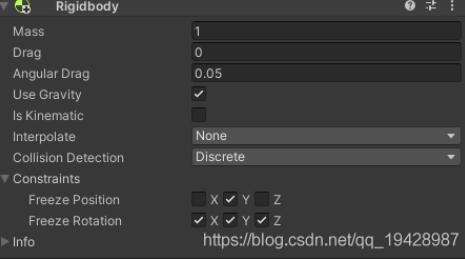
如上图所示,各参数含义如下:
Mass 质量:单位任意。但是官方建议物体的质量差不要超过100倍
Drag 阻力:物体移动时受到的空气阻力,0表示无阻力
Angular Drag 角阻力:当受扭力时物体旋转时受到的空气阻力,同样0表示无阻力
Use Gravity 使用重力:表示该物体是否受重力影响
Is Kinematic 是否是运动学:游戏对象是否遵循运动学规律,如果激活不在受物理引擎驱动(动画控制移动,不勾选)
Interpolate 插值:物体运动的插值模式
Collision Detection 碰撞检测:碰撞检测模式。用于避免高速物体穿过其它物体未发生碰撞
Constraint 约束:对刚体运动的约束,可以锁定位置和旋转的x、y、z轴
- Collider:碰撞器有很多中,需要根据实际的需要选择不同的触发器,这里只是简单的介绍其基础功能
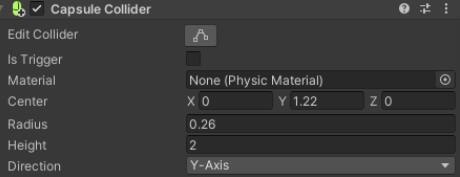
Is Trigger 触发器:勾选该选项,碰撞用于触发事件 OnTriggerEnter、OnTriggerExit、OnTriggerStay并被物理引擎所忽略
Input.GetAxis(args) :获取移动方位。
float h = Input.GetAxis("Horizontal");//对应键盘的上下
float v = Input.GetAxis("Vertical");//对应键盘的左右
通过插值运算,控制主角平滑的转向和移动:
void Update()
{
 role.SetBool(StealthConst.SNEAK, Input.GetKey(KeyCode.LeftShift));
 float h = Input.GetAxis("Horizontal");
 float v = Input.GetAxis("Vertical");
 if (Mathf.Abs(h) > 0.1f || Mathf.Abs(v) > 0.1f)
 {
 //5.6由动画控制器中的参数决定
 float currentSpeed = Mathf.Lerp(role.GetFloat(StealthConst.SPEED), 5.6f, moveSpeed * Time.deltaTime);
 role.SetFloat(StealthConst.SPEED, currentSpeed);//Animator通过速度控制移动的快慢
 Vector3 targetDir = new Vector3(h, 0, v);
 //Vector3.up相当于(0,1,0)绕着Y轴,看向目标位置
 Quaternion newRotation = Quaternion.LookRotation(targetDir, Vector3.up);
 transform.rotation = Quaternion.Lerp(transform.rotation, newRotation, rotateSpeed * Time.deltaTime);
 }
 else
 {
 role.SetFloat(StealthConst.SPEED, 0);
 }
}
摄像机跟随
摄像机跟随的原理十分简单,在场景设计中将相机和主角的相对位置保持固定,跟随主角移动即可。但是有种特殊情况,当主角移动到墙边,被遮挡后如果还是保持原来的相对位置,则视野中将观察不到主角,这时需要动态的调整摄像机的位置。
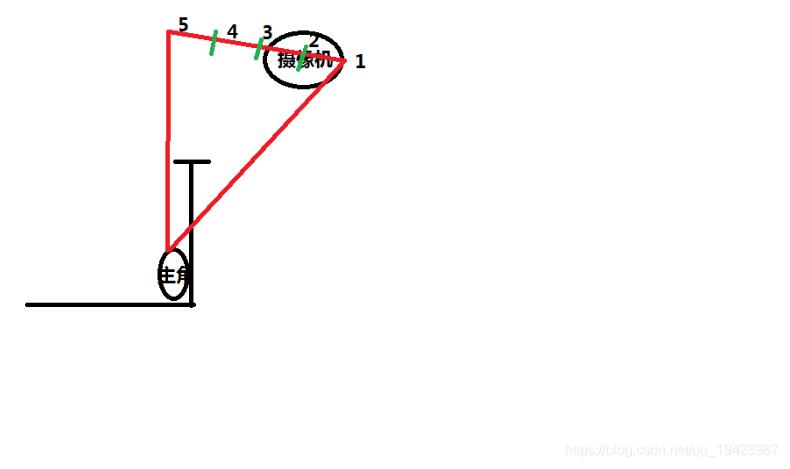
这里将采用射线碰撞的方式来检查,从相机的位置开始,到主角正上方截止,平均划分3个点,依次从五个点分别发射一条射线,当射线能直接碰到主角或者没有碰到说明主角在摄像的范围内,将摄像机平滑的移动到能够看到主角的位置即可。
using System.Collections;
using System.Collections.Generic;
using UnityEngine;

public class FollowPlayer : MonoBehaviour
{
 private Vector3 offset;
 public Transform role;
 public float moveSpeed = 3;
 public float rotateSpeed = 3;

 // Start is called before the first frame update
 void Start()
 {
 offset = transform.position - role.position;
 offset = new Vector3(0, offset.y, offset.z);
 }

 // Update is called once per frame
 void Update()
 {
 Vector3 beginPos = role.position + offset;//摄像机正常偏移位置,起点
 Vector3 endPos = role.position + offset.magnitude * Vector3.up;//offset.magnitude向量的长度
 ///从起点到终点分别取3个点,通过射线判断摄像机是否有遮挡
 Vector3[] posArr = new Vector3[] {
  beginPos,
  Vector3.Lerp(beginPos,endPos,0.25f),
  Vector3.Lerp(beginPos,endPos,0.5f),
  Vector3.Lerp(beginPos,endPos,0.75f),
  endPos
 };
 Vector3 targetPos = posArr[0];
 foreach (var pos in posArr)
 {
  RaycastHit hitInfo;
  ///第一个参数射线的起点,第二个参数射线的方向
  if (Physics.Raycast(pos, role.position - pos, out hitInfo))
  {
  if (hitInfo.collider.tag == StealthConst.PLAYER)
  {
   targetPos = pos;
   break;
  }
  else
  {
   continue;
  }
  }
  else
  {
  targetPos = pos;
  break;
  }
 }
 this.transform.position = Vector3.Lerp(transform.position,targetPos,Time.deltaTime*moveSpeed);//通过插值平滑移动
 Quaternion nowRotation = transform.rotation;
 this.transform.LookAt(role.position);//摄像机转向目标
 this.transform.rotation = Quaternion.Lerp(nowRotation, transform.rotation, Time.deltaTime * rotateSpeed);//通过插曲平滑旋转
 }
}
以上就是本文的全部内容,希望对大家的学习有所帮助,也希望大家多多支持得得之家。
本文标题为:Unity实现主角移动与摄像机跟随


基础教程推荐
- 如何动态获取文本框中datagridview列的总和 2022-01-01
- JSON.NET 中基于属性的类型解析 2022-01-01
- 从 VS 2017 .NET Core 项目的发布目录中排除文件 2022-01-01
- 经典 Asp 中的 ResolveUrl/Url.Content 等效项 2022-01-01
- 将事件 TextChanged 分配给表单中的所有文本框 2022-01-01
- 首先创建代码,多对多,关联表中的附加字段 2022-01-01
- 在 VS2010 中的 Post Build 事件中将 bin 文件复制到物 2022-01-01
- 错误“此流不支持搜索操作"在 C# 中 2022-01-01
- 全局 ASAX - 获取服务器名称 2022-01-01
- 是否可以在 asp classic 和 asp.net 之间共享会话状态 2022-01-01


