这篇文章主要为大家介绍了AVX2指令集浮点乘法性能分析,有需要的朋友可以借鉴参考下,希望能够有所帮助,祝大家多多进步,早日升职加薪
一、AVX2指令集介绍
AVX2是SIMD(单指令多数据流)指令集,支持在一个指令周期内同时对256位内存进行操作。包含乘法,加法,位运算等功能。下附Intel官网使用文档。
Intel® Intrinsics Guide
我们本次要用到的指令有 **__m256 _mm256_mul_ps(__m256 a, __m256 b), __m256d_mm256_mul_pd(__m256d a, __m256d b)**等,(p代表精度precision,s代表single,d代表double)
它们可以一次取256位的内存,并按32/64位一个浮点进行乘法运算。下附官网描述。
Synopsis
__m256d _mm256_mul_pd (__m256d a, __m256d b)
#include <immintrin.h>
Instruction: vmulpd ymm, ymm, ymm
CPUID Flags: AVX
Description
Multiply packed double-precision (64-bit) floating-point elements in a and b, and store the results in dst.
Operation
FOR j := 0 to 3
	i := j*64
	dst[i+63:i] := a[i+63:i] * b[i+63:i]
ENDFOR
dst[MAX:256] := 0
Performance
| Architecture | Latency | Throughput (CPI) |
|---|---|---|
| Icelake | 4 | 0.5 |
| Skylake | 4 | 0.5 |
| Broadwell | 3 | 0.5 |
| Haswell | 5 | 0.5 |
| Ivy Bridge | 5 | 1 |
二、代码实现
0. 数据生成
为了比较结果,我们用1+1e-8填充。这里利用模版兼容不同数据类型。由于AVX2指令集一次要操作多个数据,为了防止访存越界,我们将大小扩展到256的整数倍位比特,也就是32字节的整数倍。
uint64_t lowbit(uint64_t x)
{
    return x & (-x);
}
uint64_t extTo2Power(uint64_t n, int i)//arraysize datasize
{
    while(lowbit(n) < i)
        n += lowbit(n);
    return n;
}
template <typename T>
T* getArray(uint64_t size)
{
    uint64_t ExSize = extTo2Power(size, 32/sizeof(T));
    T* arr = new T[ExSize];
    for (uint64_t i = 0; i < size; i++)
        arr[i] = 1.0+1e-8;
    for (uint64_t i = size; i < ExSize; i++)
        arr[i] = 1.0;
    return arr;
}
}
1. 普通连乘
为了比较性能差异,我们先实现一份普通连乘。这里也使用模版。
template <typename T>
T simpleProduct(T* arr, uint64_t size)
{
    T product = 1;
    for (uint64_t i = 0; i < size; i++)
        product *= arr[i];
    return product;
}
2. AVX2指令集乘法:单精度浮点(float)
这里我们预开一个avx2的整形变量,每次从数组中取8个32位浮点,乘到这个变量上,最后在对这8个32位浮点进行连乘。
float avx2Product(float* arr, uint64_t size)
{
    float product[8] = {1};
    __m256 product256 = _mm256_setr_ps(1, 1, 1, 1, 1, 1, 1, 1);
    __m256 load256 = _mm256_setzero_ps();
    for (uint64_t i = 0; i < size; i += 8)
    {
        load256 = _mm256_loadu_ps(&arr[i]);
        product256 = _mm256_mul_ps(product256, load256);
    }
    _mm256_storeu_ps(product, product256);
    product[0] *= product[1] * product[2] * product[3] * product[4] * product[5] * product[6] * product[7];
    return product[0];
}
3. AVX2指令集乘法:双精度浮点(double)
double avx2Product(double* arr, uint64_t size)
{
    double product[4] = {1};
    __m256d product256 = _mm256_setr_pd(1, 1, 1, 1);
    __m256d load256 = _mm256_setzero_pd();
    for (uint64_t i = 0; i < size; i += 4)
    {
        load256 = _mm256_loadu_pd(&arr[i]);
        product256 = _mm256_mul_pd(product256, load256);
    }
    _mm256_storeu_pd(product, product256);
    product[0] *= product[1] * product[2] * product[3];
    return product[0];
}
三、性能测试
测试环境
| Device | Description |
|---|---|
| CPU | Intel Core i9-9880H 8-core 2.3GHz |
| Memory | DDR4-2400MHz Dual-Channel 32GB |
| complier | Apple Clang-1300.0.29.30 |
计时方式
利用chrono库获取系统时钟计算运行时间,精确到毫秒级
uint64_t getTime()
{
    uint64_t timems = std::chrono::duration_cast<std::chrono::milliseconds>(std::chrono::system_clock::now().time_since_epoch()).count();
    return timems;
}
测试内容

	uint64_t N = 1e8;
    // compare the performance of simpleProduct and avx2Product
    uint64_t start, end;
    //compare float
    cout << "compare float product" << endl;
    float* arr = getArray<float>(N);
    start = getTime();
    float simpleProductResult = simpleProduct(arr, N);
    end = getTime();
    cout << "Simple product: " << simpleProductResult << endl;
    cout << "Time: " << end - start << " ms" << endl;
    cout << endl;
    start = getTime();
    float avx2ProductResult = avx2Product(arr, N);
    end = getTime();
    cout << "AVX2 product: " << avx2ProductResult << endl;
    cout << "Time: " << end - start << " ms" << endl;
    cout << endl;
    delete[] arr;
    //compare double
    cout << "compare double product" << endl;
    double* arr2 = getArray<double>(N);
    start = getTime();
    double simpleProductResult2 = simpleProduct(arr2, N);
    end = getTime();
    cout << "Simple product: " << simpleProductResult2 << endl;
    cout << "Time: " << end - start << " ms" << endl;
    cout << endl;
    start = getTime();
    double avx2ProductResult2 = avx2Product(arr2, N);
    end = getTime();
    cout << "AVX2 product: " << avx2ProductResult2 << endl;
    cout << "Time: " << end - start << " ms" << endl;
    cout << endl;
    delete[] arr2;
进行性能测试
第一次测试
测试命令
g++ -mavx2 avx_product.cpp
./a.out
测试结果 方法耗时(ms)AVX2乘法 单精度57普通乘法 单精度232AVX2乘法 双精度121普通乘法 双精度243
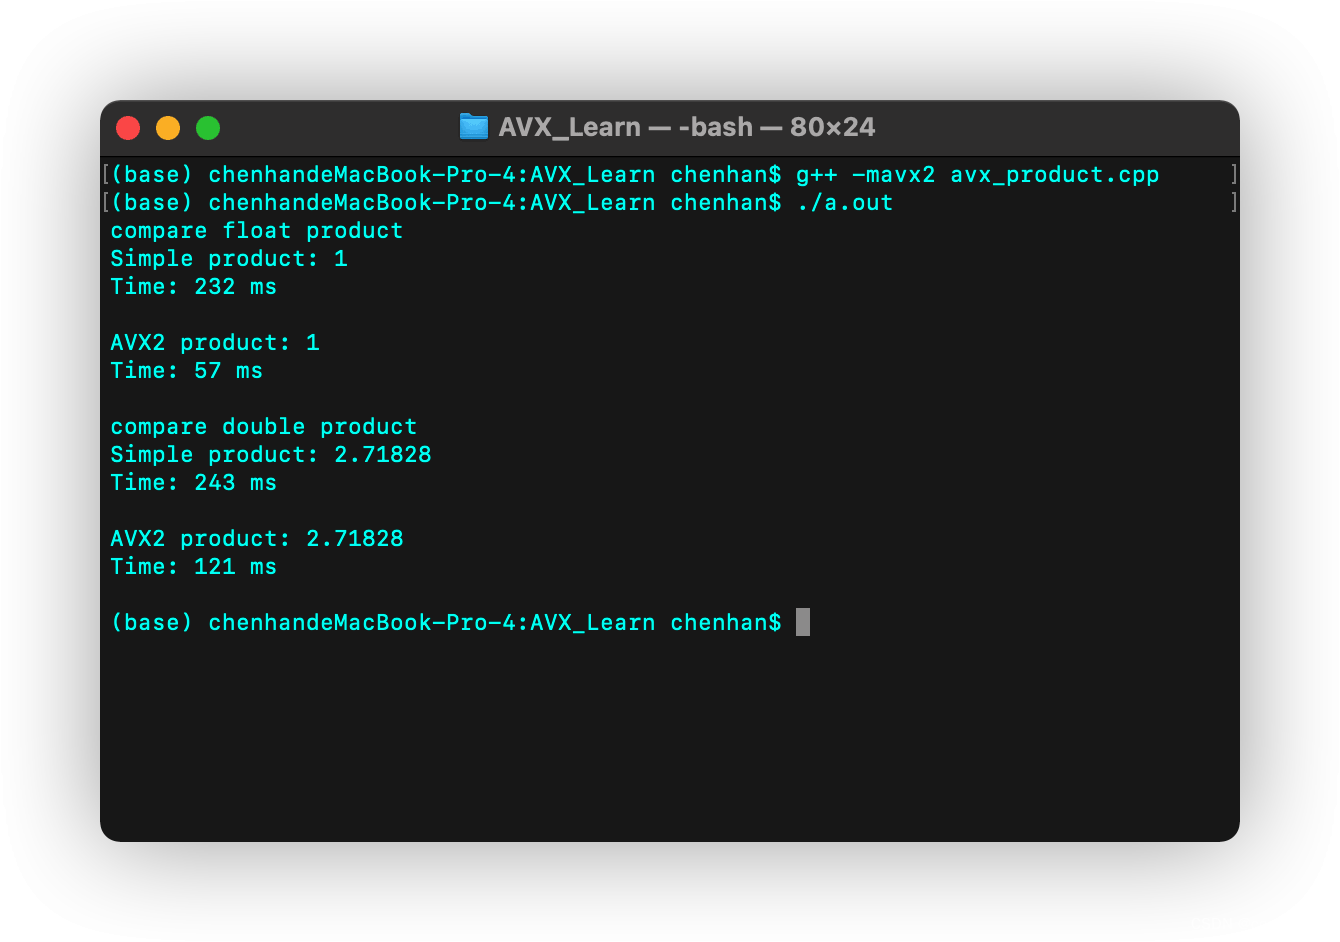
这里能看到单精度下已经出现了比较明显的误差,同时由于CPU内部没有普通的单精度浮点运算器,所以单精度运算和双精度耗时所差无几。
第二次测试
测试命令
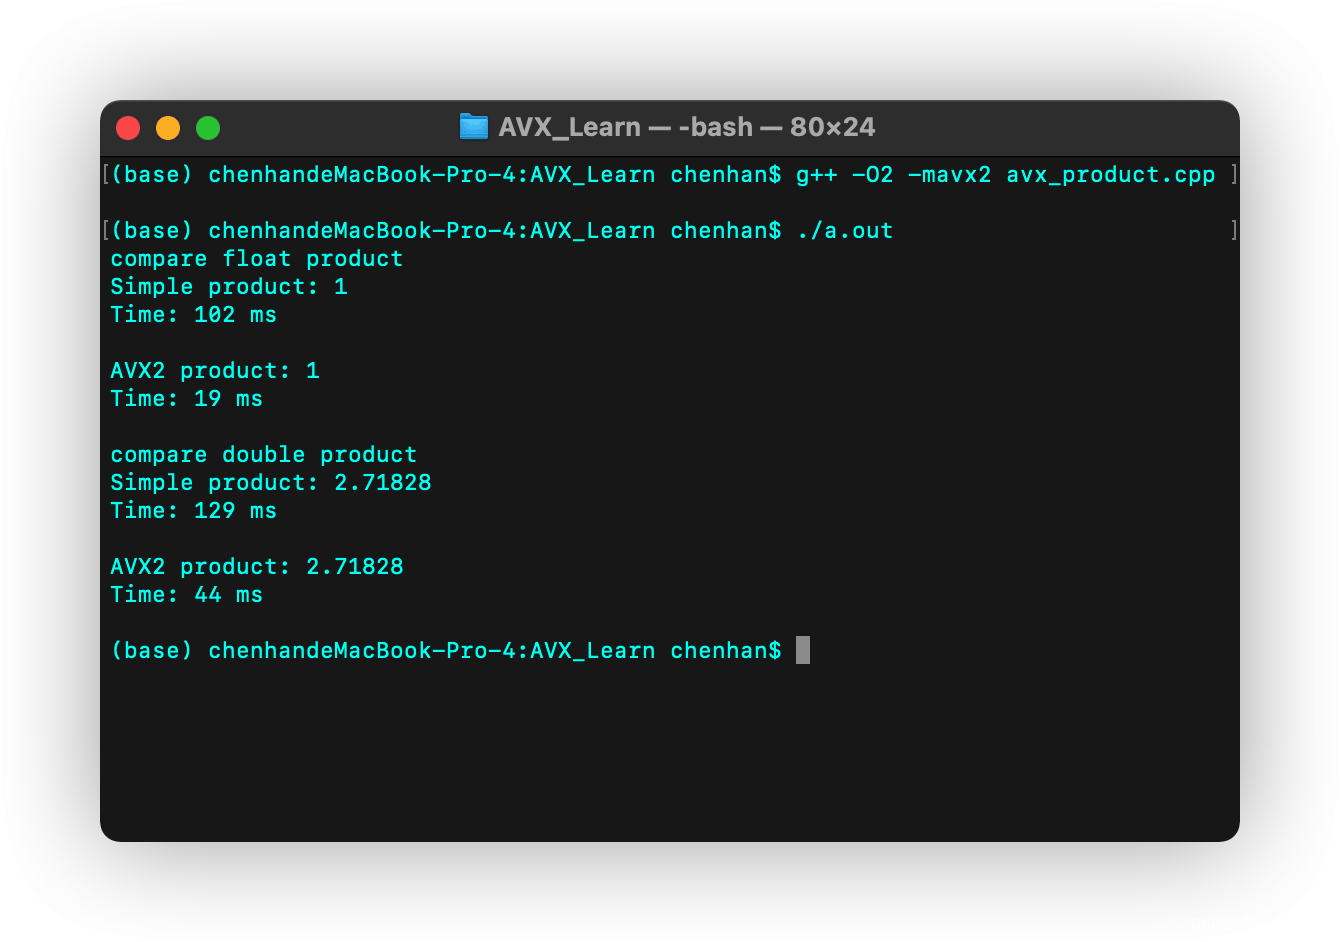
现在我们再开启O2编译优化试一试:
g++ -O2 -mavx2 avx_product.cpp
./a.out
测试结果
| 方法 | 耗时(ms) |
|---|---|
| AVX2乘法 单精度 | 19 |
| 普通乘法 单精度 | 102 |
| AVX2乘法 双精度 | 44 |
| 普通乘法 双精度 | 129 |
四、总结
经过几次测试,我们可以大概得出,AVX指令集在浮点的运算上有比较高的性能,而整形运算的提升则没那么明显,同时AVX2执行一次运算大致会消耗双精度运算2倍的时间,所以如果需要运算的数据小于2个,则用AVX2得不到提升。
个人猜测原因:
- CPU内部整形运算器多于浮点运算器,所以启用优化时整形普通运算能得到更多提升。
- AVX2指令集专门针对浮点型进行过优化。使得运算逻辑门的关键路径长度小于普通浮点运算。
以上就是AVX2指令集浮点乘法性能分析的详细内容,更多关于AVX2指令集浮点乘法的资料请关注编程学习网其它相关文章!
本文标题为:AVX2指令集浮点乘法性能分析


基础教程推荐
- VisualStudio2010安装教程 2023-01-05
- character-encoding – Linux中最常见的C语言编码(和Unix?) 2023-11-21
- 05-C语言进阶——动态内存管理 2023-11-20
- C语言数组长度的计算方法实例总结(sizeof与strlen) 2023-04-26
- 纯C++代码详解二叉树相关操作 2023-05-15
- g++: const 丢弃限定符 2022-10-07
- 利用QT设计秒表功能 2023-05-30
- C语言植物大战数据结构二叉树递归 2023-04-09
- C语言的三种条件判断语句你都了解吗 2023-03-05
- Qt数据库应用之实现通用数据库请求 2023-03-18


