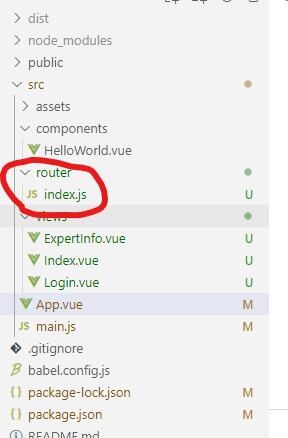
首先安装路由npm install vue-router安装完成后,在项目中新建一个router文件夹,一个index.js index.js 中写入 import { createRouter, createWebHashHistory } from vue-routerimport Index from ../views...

- 首先安装路由
npm install vue-router
-
安装完成后,在项目中新建一个router文件夹,一个index.js

-
index.js 中写入
import { createRouter, createWebHashHistory } from 'vue-router'
import Index from '../views/Index.vue'
import ExpertInfo from '../views/ExpertInfo.vue'
import Login from '../views/Login.vue'

const routes = [
  {
    path: '/',
    name: 'Index',
    component: Index
  },{
    path: '/expertList',
    name: 'ExpertInfo',
    component: ExpertInfo
  },{
    path: '/login',
    name: 'Login',
    component: Login
  },
]

const router = createRouter({
  history: createWebHashHistory(),
  routes
})

export default router
4.main.js
import { createApp } from 'vue'
import App from './App.vue'
import router from './router'
import Vant from 'vant';
import 'vant/lib/index.css';
createApp(App).use(router).use(Vant).mount('#app');
5.App.vue
<template>
  <router-view/>
</template>

<style>
#app {
  font-family: Avenir, Helvetica, Arial, sans-serif;
  -webkit-font-smoothing: antialiased;
  -moz-osx-font-smoothing: grayscale;
  text-align: center;
  color: #2c3e50;
}
</style>
6.其他组件中使用router
 methods: {
    onClickRight() {
      this.$router.push('/expertList');
    },
    onClickLeft() {
      this.$router.push('/login')
    },
  },
暂时记到这里,想起来什么了再补充。
沃梦达教程
本文标题为:vuecli4配置路由 简单记录一下


基础教程推荐
猜你喜欢
- CSS3的几个标签速记(推荐) 2024-04-07
- JS前端广告拦截实现原理解析 2024-04-22
- js禁止页面刷新与后退的方法 2024-01-08
- 关于文字内容过长,导致文本内容超出html 标签宽度的解决方法之自动换行 2023-10-28
- 浅谈Vue2和Vue3的数据响应 2023-10-08
- this[] 指的是什么内容 讨论 2023-11-30
- 基于Vue制作组织架构树组件 2024-04-08
- Ajax实现动态加载数据 2023-02-01
- vue离线环境如何安装脚手架vue-cli 2025-01-19
- 浅析canvas元素的html尺寸和css尺寸对元素视觉的影响 2024-04-26


